YouTube Banner Resize for Beginners: Step-by-Step Instructions Without Losing Quality

A YouTube banner isn’t just a decorative element—it’s the first impression viewers get when they land on your channel. A well-designed banner sets the tone for your content, communicates your brand’s identity, and enhances your channel’s professionalism. However, resizing a YouTube banner to fit different devices can be tricky, often leading to stretched, blurry, or cropped images. That’s where the right tools and techniques come in. With an AI video editor, you can resize your banner effortlessly while maintaining its quality. This guide walks you through everything you need to know about resizing a YouTube banner without compromising clarity.
Understanding YouTube Banner Size Requirements
Before jumping into the resizing process, it’s essential to understand YouTube’s banner size requirements. YouTube banners must follow specific dimensions to ensure they look great on all devices, including desktops, tablets, mobile phones, and TVs.
The recommended size for a YouTube banner is 2560 x 1440 pixels, with a safe zone of 1546 x 423 pixels. The safe zone is crucial because this is the area that remains visible across all screen sizes. Any text or important elements placed outside this zone may be cut off when viewed on smaller screens.
Many beginners make the mistake of uploading images that are either too small or improperly cropped. This results in low-resolution banners that appear pixelated or have key design elements missing. Understanding these specifications helps ensure that your banner remains sharp, well-placed, and visually appealing across all devices.
Choosing the Right Tool for Resizing
Resizing a YouTube banner isn’t as simple as stretching an image to fit the required dimensions. Without the right tool, you risk losing quality, distorting your design, or misplacing key elements.
Beginners often struggle to choose between free and paid resizing tools. Free tools can be useful for basic adjustments, but they often lack the precision needed to maintain high resolution. Paid tools, on the other hand, offer advanced features like AI-powered resizing, automated safe zone adjustments, and high-quality exports.
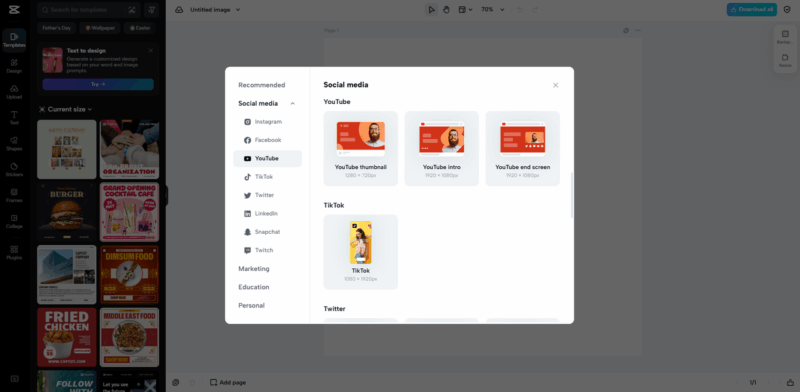
When selecting a YouTube banner resizer, look for features such as custom aspect ratio settings, lossless scaling, and real-time previews. AI-powered tools make the process even smoother by automatically adjusting images while preserving details and sharpness. If you’re looking for an effortless way to resize your banner without losing quality, using a YouTube banner resize tool ensures your banner is optimized for all devices.
Resizing Your YouTube Banner with Pippit
Pippit is an AI-powered resizing tool that takes the guesswork out of YouTube banner adjustments.
Whether you’re a beginner or an experienced creator, its intuitive interface allows you to resize images with precision while keeping the quality intact. Here’s how you can resize your banner in three simple steps:

Step 1: Upload Your Banner Image
Begin by uploading your existing banner to Pippit. The tool automatically detects the dimensions of your image and suggests the necessary adjustments based on YouTube’s size requirements. If your banner is too small, the AI-powered system enhances its resolution without pixelation.
Step 2: Adjust Dimensions and Maintain Quality
Once uploaded, you can adjust the dimensions to fit the 2560 x 1440 pixels size while keeping the important elements within the safe zone.
Pippit’s AI technology ensures that the resizing process doesn’t blur or stretch the image. Additionally, you can tweak the placement of text, logos, and graphics to ensure they remain visible on all screen sizes.
Step 3: Preview and Export Your Banner
Before finalizing, use the preview feature to see how your banner will appear on different devices, from desktops to mobile phones. This allows you to make last-minute adjustments if needed. Once satisfied, export your banner in high resolution and upload it directly to your YouTube channel.

Optimizing Your Banner for Different Devices
A YouTube banner appears differently on various devices, making it crucial to optimize its design for each screen size. On desktop screens, the full 2560 x 1440-pixel banner is visible, while on mobile devices, only a smaller portion of the image is displayed.
On smart TVs, the banner stretches to fit the larger screen, which can distort improperly designed images.
To ensure your banner looks good on every device, place critical elements such as text, logos, and CTAs within the 1546 x 423-pixel safe zone. This guarantees that no matter how the banner is cropped, essential details remain visible. Previewing your banner across multiple devices before uploading helps avoid awkward cut-offs or distortions.
Common Mistakes to Avoid
Resizing a YouTube banner may seem simple, but there are several mistakes that can ruin the final outcome. One of the most common errors is stretching or distorting the image. Many users attempt to resize banners manually, which often results in warped graphics and blurred text. Using an AI-powered tool prevents this issue by maintaining proportions and quality.
Another mistake is using low-resolution images. A blurry banner can make your channel look unprofessional, so always use high-quality images with a resolution of at least 2560 x 1440 pixels.
Additionally, ignoring the safe zone can lead to important elements getting cut off. If your logo or text is outside the 1546 x 423-pixel area, it may not be visible on smaller screens, making your banner look incomplete. Always double-check placements before finalizing your design.
Saving and Uploading Your Resized Banner
Once you’ve successfully resized your banner, the next step is saving it in the right format. YouTube supports JPG, PNG, and GIF formats, but for the best quality, PNG is recommended. This format preserves details and prevents compression-related blurriness.
Before uploading, make sure your file size is under 6MB, as YouTube has an upload limit. If your image exceeds this, use a lossless compression tool to reduce the file size without compromising quality.
To upload your resized banner:
- Open YouTube Studio and go to Customization > Branding
- Click Change under the Banner image section
- Select your resized banner and preview it across devices
- Click Publish to update your banner

After uploading, refresh your channel page and check how the banner appears on different screens. If anything looks off, go back and make adjustments to ensure a perfect fit.
Conclusion
Resizing a YouTube banner doesn’t have to be a frustrating experience. By understanding YouTube’s size requirements, using the right tools, and following a structured resizing process, you can create a professional-looking banner without losing quality. Tools like Pippit take the hassle out of resizing by offering AI-powered adjustments that keep your design sharp and well-proportioned. Whether you’re a beginner or an experienced creator, these tools ensure your banner is perfectly optimized for all devices.